| Installing 1996-1997 style color matched door handles. |
 |
 |
One
feature of the Late model Cougar and Thunderbirds that was a major style
improvement over earlier years, came out in 1996.
The
color-matched exterior door handles. These door handles are very easily
changed out on our earlier birds and cougars
Parts List:
2
Exterior Door Handles from 1996 to 1997
Part
# F6SZ-6322404-H Hndl ASY-DR O (this part number is for black)
Part
# F6SZ-6322405-H Hndl ASY-DR 0 (this part number is for black)
1
Lockset Part
# F6SZ-6322050-A LS13 (this is the non-lighted lockset)
4
Pop Rivets, 3/16" diameter shank, 1/2"long shank, 1/2" head to attach the handles to
the door.
Procedure:

1.
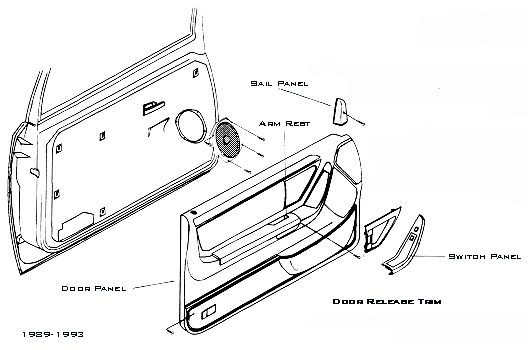
Remove single phillips screw in upper portion of power options switch
panel (if equiped) and slid panel toward front of vehicle to remove.
Note:
On later models, this screw will not be present.
2.
Carefully pry outward on upper portion of switch panel to release retaining
clip, then slide panel toward front of vehicle to remove.
3.
Remove phillips screws from rear side of switch panel and pry off connectors.
4.
Remove one (1) phillips screw from door "sail panel" and remove panel.
Remove one (1) phillips-head screw from front of armrest.
5.
Pry outward on upper portion of door release trim to release retaining
clips, then slide upward and forward to remove.
6.
Remove one (1) phillps screw from carpeted portion of door panel, behind
courtesy light.
7.
Lift door panel off window channel. Disconnect courtesy light connector
and remove panel. Re-install door panel by reversing removal steps.
8. Carefully Peel Back
the water shield. You only need to pull enough of the shield away from
the edge to gain access to the interior of the door.

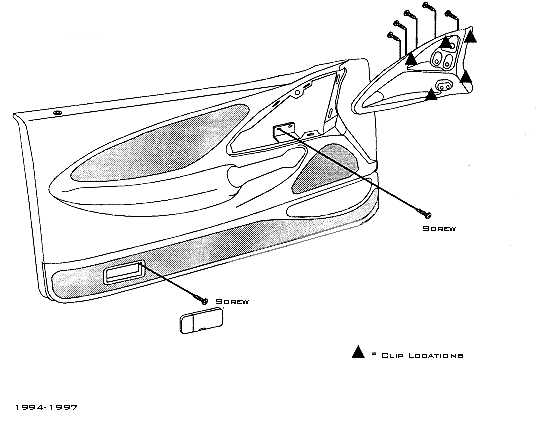
1. Unsnap courtesy light lens by prying out at slot in bottom and remove
single phillips-head screw from upper front corner of courtesy light frame.
2.
Pry outward to release retaining clips along front, top, and bottom edges
of door release handle trim, then slide trim forward to remove.
3.
Remove five (5) phillips screws securing power window and lock switch
connectors to rear of panel and pry connectors off.
4.
Pry connector off rear of power mirror switch and remove panel.
5.
Remove single phillips-head screw from bracket in front of door release
handle.
6.
Lift door panel upward, off of window channel and off of door.
7.
Disconnect courtesy light connector behind door panel and remove panel.
8. Carefully Peel Back
the water shield. You only need to pull enough of the shield away from
the edge to gain access to the interior of the door.
Door panel installation is the reverse of installation.
9. Take a small center punch and
drive out the center of the two rivets on the exterior door handle.
10. Take a 3/16" Drill
bit and carefully drill out the rivets.

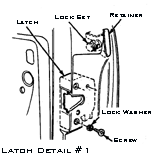
11. Remove the lock cylinder
clip from the edge of the door. This clip is steel that is bent into a
spring to hold the lock cylinder. Use a screw drive to pry it straight out
and grasp it with pliers to remove it all the way. SAVE this clip.
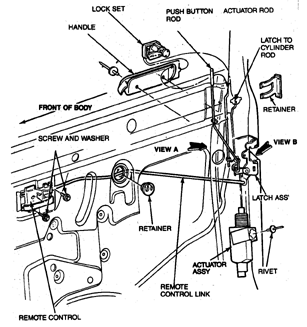
12. From inside the door disconnect the lock rod from the door lock cylinder.
You need to turn the cylinder in order to allow for the rod to come away
from the back of the cylinder. (Note: If your vehicle has illuminated
entry, you will have a thin pair of wires that is attached to the lock-cylinder.
Disconnect this wire in order to remove the lock from the door.)
13. From inside the door. Remove the door latch rod from the handle.
You will find a plastic rod retainer attached along with the metal rod.
The plastic retainer has a plastic clip that is one piece of plastic that
keeps the rod locked into the handle. You pull the rod out after the plastic
tab is free of the rod. You can now take the handle off the door.
14. Place the new door handle to the door and attach the door latch rod.

15. While holding handle in place attach the door handle to the out door
skin. You will use 2 rivets for each side.
16. Insert the door lock cylinder into the new door handle.and attach
the door lock rod to the cylinder.
17. Replace the lock-cylinder clip previously saved to hold the cylinder
firmly in place.
18. Test the operation of the handle and key lock.
19 Replace Door Panel.
Your new lockset also came with a new Ignition lock cylinder. You can
choose to replace it at this time or not.
1. Remove the steering column trim pieces. (4) screws.
2. Remove the single key warming wire ( it is the single black/purple
wire coming out of the key housing) follow it to its connector and seperate
the connector.
3. Insert the key into the cylinder and turn the key forward to the run
position.
4. Insert a 1/8" center punch or stiff piece of wire into the hole
in the Aluminum casting below the lock cylinder and push the locking pin
in. While pressing in on the pin pull the cylinder straight out.
4a. Pre 1994 Owners take note. ! You will have
to remove the tumbler section from the new lock cylinder and replace it
into the old lock cylinder.
4b. To do this take the old cylinder and the new cylinder and put them
side byside. Insert the keys into each if they are not already in them.
4c. Take the cylinder and pull on the black part of the lock.(where the
keys is) This will alow the tumbler section to come out. Be mindful of
the brass spring on the side. It has a small plastic foot on it thaqt
might get caught up. Also be mindful of the two small pins that are inside
the cylinder bore. The bore has two small pins pushed forward by springs.
Make sure they are still in the tracks. If they got stuck to the tumbler
with the grease be sure to put them back.
4d. Now take the new tumbler section and your old cylinder section. Your
going to insert the new section into it. Be careful of that spring. As
it will get caught on the upper ring of the tumbler. Just carefully hold
it back till it clears. You will need to line up the half round shape
on the tumbler to the back of the cylinder to make sure it seats fully.
4e. Now rotate the key into the cylinder till you hear a click. The key
should be able to be removed now.
4f. Replace the key into the lock and proceede with the next step.
5. Take your new cylinder and insert the key into it.
6. Insert the cylinder by turning it to the Run Position and pressing
the retaining pin. Insert it straight into the cylinder casting. Make
sure it is aligned and seated before turning the key to the OFF position.
7. Test the operation of the lock
8. Connect the chime warning wire and reinstall the column trim.
Email : mn12Mike
with any questions.
| Sponsor Links |
 |
 |
|