| Lincoln Motor Sports White Face Gauges Install |
 |
 |
Lincoln Motor Sports is your best source for white face gauges for the
1994 & up Thunderbirds & Cougars. These new gauge faces give
your dash a sporty look and can be customized to your specification.
While most white face gauge kits go for around $150, these are only $35
per sheet or $70 if you have them cut for you. For an extra $10 you
can get custom lettering, coloring, or wording & logos. Please
check with Geno for latest prices since they may go up since I purchased
mine. Installation is fairly easy but can be delicate and patience
is needed. Average install time is an hour and a half. To order
your gauges call Lincoln Motor Sports at (856) 456-3605. They do
not take credit cards so you will need to send a money order. You
can e-mail them with your questions at lincolnmotorsport@maxrpm.com
or check out their website
here.
Your stock gauges are made of black plastic with green numbers.
They are illuminated by a clear light bulb which makes the numbers appear
green when lit. The LMS gauges use white paper and black numbers
with clear outlines. When illuminated with the same bulb they will
loose coloring and will glow as if you were looking at a plain lightbulb.
To correct this you need to install bulb covers when doing this modification.
You will need 5 bulb covers and since they are sold in packs of 3 you will
need 2 packs. Packs sell for $3-$4 each and are manufactured by AutoMeter.
You can get them from your local parts store or order them from CarParts.com.
Part numbers are:
Green 3215
Red 3214
Blue 3207
Yellow 3208
Likewise, your needles are painted white on the bottoms. This
makes them glow white at night. This will work fine with your new
faces since the faces will not illuminate much at night, letting the needles
glow white. If you choose to change the color of your needle illumination,
you will need to paint the bottom of the needles when you have them removed.
The only exception is where the needle crosses the mounting section.
There you paint the top. Do not paint the whole needle, just the
flat bottom surface, or top surface if over the mounting section.
1: Start your car and bring it up to a normal operating
temperature. You may choose to drive it for ten minutes or so to
make sure it has fully warmed up. With your car running, make notes
of how your gauges read. This is very important to be able to properly
calibrate your gauges once you're done. If your car is like mine,
they probably always read the same. Take notes of:
? Oil pressure, both in park and in gear with
your foot on the brake
? RPMs at idle in park and in drive with foot
on the brake
? Voltage in park, and in park with the lights,
radio & A/C on full
? Fuel level
? How far away from the odometer reset bar
your speedometer needle is
? Normal coolant operating temperature
? What speed your car is at when in 1st gear
at 4000 RPM
? What speed your car is at in 2nd gear at
3000 RPM
2: Disconnect your negative battery cable.
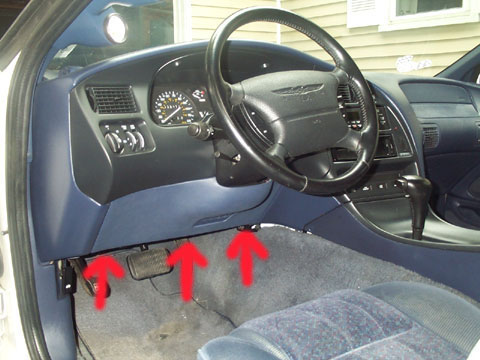
3: Remove the colored plastic panel from below the steering
wheel.? Do this by removing the 3 7mm bolts on the bottom of this panel just under the dash.? Once those are out it is only held
on by 2 clips on the top of the panel.? Pulling on the panel will release these clips.? Next remove the black plastic dash trim
piece from above the steering wheel.? It is held on by 3 6mm bolts along the bottom and 2 6mm bolts on the top just above the gauges.?
The bottom bolts are visible once the first panel has been removed.? With all 5 bolts out of the top panel it is held
on by clips like the bottom panel.? Pull the panel out.?T his may take some work since it contains an air vent and is a tight squeeze
past the steering wheel.? It is easier if you tilt the wheel to it's lowest position.? Once the panel is out past the wheel, unplug
the rear defroster switch from it and remove the panel.
4: Use a 7mm socket to remove the 4 black screws which
hold the gauge assembly into the dash. Pull the bottom of the gauge
assembly out towards you so the gauges are facing up. This will give
you access to the back of the assembly where you now need to unplug both
of the 2 large plugs, one on each side of the assembly. With the
assembly unplugged you can now pull it out of the dash.

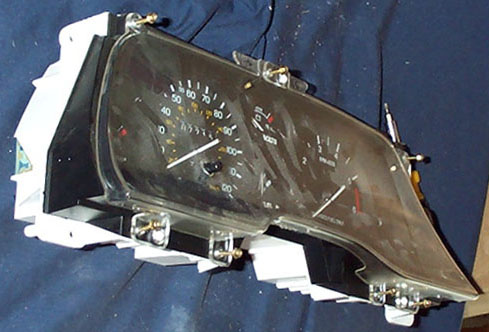
5: Place the assembly on a clean, flat surface. Use
a Torx bit screw dirver to remove the 7 gold plated screws holding
the plastic cover onto the assembly. If you do not have a Torx bit
you can also use a 5.5mm socket. Remove the clear plastic cover.
Next remove the black plastic trim piece. This will just lift off
once you remove the clear cover.

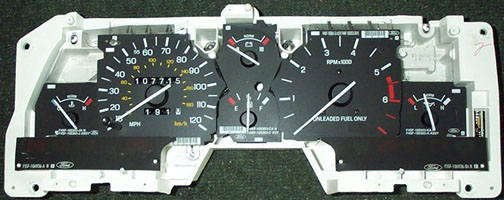
6: IMPORTANT! Remember exactly where your gauges
are reading. It is a very good idea to take a picture or at least
draw a diagram of their readings. You will be removing the needles
and for your gauges to read properly upon re-installation, they need to
go back exactly where they came from.
7: There are 5 sets of gauges in the assembly. The
middle two (voltage & fuel) are one unit. Remove one of the gauges
by hand. They simply pull out and are attached to the back of the
assembly with long metal pins which also make the electrical connections.
Use a fork to pull the needles off. Simply slide the shaft that attaches
to the needle between two prongs, push the prongs all the way in so the
shaft meets the end of the prongs, and twist the fork while pulling up.
With a little work the needle will pop off. With the needle out of
the way you can peel the old gauge face off by hand. It will leave
glue residue on the gauge. Do not clean it off. It will be
used to stick the new face on. The tachometer face is also attached
by 3 small philips head screws. You will need to remove these to
get the face off and attach the new face.

8: If you are going to change the color of your needles
paint then now that they are off. Make sure you give them enough
time to dry before you re-install them. If you are going to add light
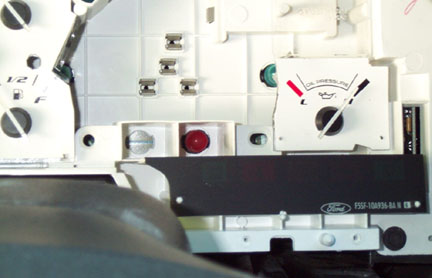
bulb covers you will now have access to the bulbs as you remove gauges.
Do not put covers on the two bulbs on either side of the volt gauge and
located in the deep shafts on the top of the assembly. They are your
turn signal bulbs and will be covered by a green coating when you re-assemble
the unit. There is also a bulb located behind the bottom right of
the tachometer right below the word "ONLY" in UNLEADED FUEL ONLY".
It is you "CHECK GAUGES" bulb. Since your new gauge faces do not
have this wording on the you need to decide what you want to do with this
bulb. I chose to put a red cover on mine so the bottom right corner
or the tach will glow red if this light comes on. You may choose
to remove the bulb but be aware that this warning will not be available
to you.
9: Carefully cut out your new gauge face for the gauge
you just removed. I chose to cut mine with a very sharp pair of scissors
and a utility knife. Do not remove the clear plastic backing.
If the edges or the opening for the needle are not 100% perfect it will
be OK. The gauge trim piece or needle mount will cover this.
On most you will also need to poke a pair of small mounting holes in the
face. This can be done with a sharp nail or screw. Again, these
will not show and are just used to allign the face. Be careful with
your new faces. They can become dirty and damage or even smear easily.
Once you have the face cut, carefully press it on the gauge making sure
it is straight. The glue residue from the old faces will be enough
to hold it on. Once it is in place, replace the gauge. Gently
replace the needle to the exact position which it was removed. This
does not require any force and should almost fall into place. It
is a good idea to do this job one gauge and cut one face at a time.
That way there is no confusion as to which gauge or face it is and where
it goes in the unit. Repeat this process until all gauges are done.
10: When you have all the gauges done replace the gauge
trim piece and the clear plastic cover with the 7 gold screws. Place
the assembly back into the dash opening and attach the 2 wire harnesses
to the assembly. Attach the assembly to the dash with the 4 bolts.
These bolts may be difficult to get back in since you will need a socket
with an extention and the mounting holes are at a downward angle.
A trick is to take a small piece of masking tape and put it on the top
of the bolt. Now put the bolt head in the socket. The tape
will stop it from falling out while you set the bolt in it's hole.
11: Re-connect your battery. Next remove the 7 gold
screws again which hold the plastic cover on the assembly. Remove
the plastic cover and the gauge trim piece. Start the car and let
it run until the engine has reached it's operating temperature. Check
the gauges for accuracy based upon your previous notes & pictures.
Remove and attach the needles as you find necessary. Shut off the
car and restart the car. Check the gauges for accuracy again.
Drive the car, shut the car off and restart the car. Again, check
for accuracy. This may take several attempts. To check if your
speedometer is properly calibrated first make sure your tachometer is accurate
based on readings both in park and in drive with your foot on the brake.
Now take the car up to the previously noted RPMs in the noted gears.
Do your speeds match? The fuel gauge may be trick to get right.
Note that your "low fuel" and "check gauges" lights will still work.
Watching when these turn on may help you in determining where your gauge
should read if you know where the gauge read previously when these lights
came on.
12: Turn on your lights. Do all the bulbs work?
If not replace them now. If you are having trouble getting the bulb
out of the unit you can also unscrew them from behind the assembly.
13: When you are sure that your gauges are properly calibrated
and lights are working, attach the gauge trim piece and plastic cover again.
Next attach the upper dash trim piece, remembering to connect your rear
defroster. Lastly attach the bottom trim piece.
Gagfish
| Sponsor Links |
|
|
|


