| KVR 10.8" Dual Piston Calipers and Rotors Installation Instructions |
 |
 |
By: Sir William - TCCoA President
One of the biggest complaints from Thunderbird and Cougar owners is
the poor braking quality and longevity that our cars experience. Well,
we're trying to change that. With the help of the TCCoA, KVR Performance
has introduced a 10.8" dual-piston caliper that is a direct bolt-on replacement
for our stock calipers.
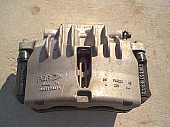 By increasing the amount of force that's exerted on the pads, the Australian-made
PBR calipers are able to slow your car down quicker and with less effort.
This added stopping power allows for safer driving and a healthy piece
of mind knowing that you can jam the binders on hard from nearly any speed
and they won't fade or go away at all.
By increasing the amount of force that's exerted on the pads, the Australian-made
PBR calipers are able to slow your car down quicker and with less effort.
This added stopping power allows for safer driving and a healthy piece
of mind knowing that you can jam the binders on hard from nearly any speed
and they won't fade or go away at all.
Please keep in mind, this installation was performed on a 1997 Thunderbird
LX. All the steps should be the same, but some bolt sizes may be slightly
different on other years. In order to complete this swap, you must have
either a 93 or later Thunderbird or Cougar or upgraded your front spindles
and anti sway bar endlinks to 1993 or newer models.
Tools and Parts Required:
-
19mm deep socket
-
15mm socket
-
14mm socket
-
10mm socket
-
3/8" ratchet with 4" or 6" extension
-
10mm open end wrench
-
Torque wrench
-
Diagonal cutting pliers
-
Floor jack
-
Jack stands
-
Brake fluid
-
12" piece of 1/8" ID clear tubing
-
A small pan to catch dripping brake fluid
-
LOTS of blue shop towels
-
...and a friend to help with the bleeding
The first thing you should do is find a level place to work and then get
the front end of the car in the air. Be sure to set the parking brake.
Step One: Remove Tires and Wheels. I really don't think I should
have to explain this one. You'll need that 19mm socket for this.
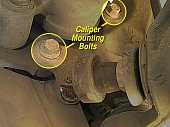 Step
Two: Remove Stock Calipers. You need to remove the caliper retaining
bolts from the spindle. These should be 15mm. You'll find this much easier
if you turn the wheel all the way away from the side you're working on.
I suggest removing the bottom bolt first as the brake line may inhibit
access to the top bolt. After you have the caliper unbolted, remove the
brake line. The banjo bolt on the brake line is 10mm.
Step
Two: Remove Stock Calipers. You need to remove the caliper retaining
bolts from the spindle. These should be 15mm. You'll find this much easier
if you turn the wheel all the way away from the side you're working on.
I suggest removing the bottom bolt first as the brake line may inhibit
access to the top bolt. After you have the caliper unbolted, remove the
brake line. The banjo bolt on the brake line is 10mm.
This is where your small drain pan and blue shop towels come in. You're
going to drip a lot of brake fluid during this process. I must caution
those who don't know...BRAKE FLUID WILL RUIN PAINT! Try to wipe
up as much of it as you can and dispose of the soiled towels in an environmentally
friendly manner. This does not mean using them to line the bird cage when
you're done.
The old caliper will slide up and slightly rearward off the rotor. If
you have heavily worn rotors, there may be a ridge preventing easy removal.
If this is the case, simply twist the caliper slightly to compress the
piston and it should come off easily.
Step Three: Remove / Repair or Replace Rotors. Remove your old
rotors from the car. This is usually quite easy, however the rotors may
be rusted to the hub or, if they're original, still held in place by some
nifty assembly washers from the factory. The assembly washers are simply
very thin steel rings designed to hold the rotors or drums on the lugs
while the cars are on the assembly line until the wheels are put on. You
can remove them by grabbing and twisting them to pieces with your diagonal
cutters.
If your rotors are rusted on, simply tap around the hub area repeatedly
until they loosen. This doesn't mean get out the 12 lb. sledge hammer.
Just keep lightly tapping around the hub as you turn the rotor until it
breaks loose. Then just pull it off.
If you're replacing the rotors, you've got it made. Simply put the new
rotors on and you're done. However, if you're using your existing rotors,
you'll want to have then checked for trueness and thickness tolerance.
Any competent parts store should be able to handle this part. They'll put
them on a brake lathe and turn them to ensure a straight, flat surface.
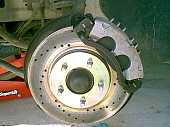 Step
Four: Mount New Calipers. Since your PBR calipers already come with
the pads loaded, you don't have to worry about that. All you need to do
is slide the caliper on over the rotor where the stock one came off. They
can be a bit of a pain to line up perfectly, but a little perseverance
and you'll make it. Using the original retaining bolts, attach the new
calipers to the spindle. A little Loctite Blue here wouldn't hurt. Be sure
you get them good and tight, you don't want them backing out any time soon.
:o)
Step
Four: Mount New Calipers. Since your PBR calipers already come with
the pads loaded, you don't have to worry about that. All you need to do
is slide the caliper on over the rotor where the stock one came off. They
can be a bit of a pain to line up perfectly, but a little perseverance
and you'll make it. Using the original retaining bolts, attach the new
calipers to the spindle. A little Loctite Blue here wouldn't hurt. Be sure
you get them good and tight, you don't want them backing out any time soon.
:o)
IMPORTANT: The calipers will mount on either
side of the car equally well. Be sure to mount them with the bleed screw
on top. If not, you will not be able to remove air from the system.
Step Five: Attach Brake Line. Since the PBR calipers use longer,
better banjo bolts, you'll need to remove the old bolts and copper crush
washers from the mounting block on the end of the brake line. There are
several ways to do this, just be sure that you don't hurt the mounting
surface of the block in any way. I would suggest using your diagonal cutters
or a flat screwdriver to gently pry up on the washer to get it passed the
first thread of the bolt. From there, you should be able to remove it completely
by simply holding it with your pliers and backing out the bolt.
Next, simply put the new banjo bolt through the block with a copper
crush washer on either side, and mount it to the caliper using your 14mm
socket. This connection needs to be tight, but not too tight. 1/2 to 3/4
turns past snug should seat the washers quite well.
Step Six: Bleeding. Of course you may already have done this
once or twice if you slipped with a wrench or pinched your fingers somehow.
But we're not talking about you, we're talking about your brakes! The process
of bleeding is done to remove all the air from the brake lines. Air in
brake lines = BAD. Before you begin, make sure your master cylinder is
full. Add enough fluid to top if off if need be. Be absolutely sure your
cap is completely on your master cylinder reservoir prior to bleeding.
If not, you'll have fluid everywhere. DO NOT let your reservoir run
dry.
Starting with the passenger side, remove the rubber cap from the bleed
screw. Attach the clear hose to the nipple on the bleed screw. This will
help keep things cleaner. Now, have your friend pump the brake pedal once
or twice then hold pressure on it as you open the bleed screw. You will
see fluid come out along with some air bubbles. Repeat this process a few
times until you don't see any more bubbles. Then, taking the wooden handle
of a hammer or the plastic handle of a screwdriver, gently tap all around
the piston area of the caliper to make sure there aren't any trapped air
bubbles in it. Bleed it once or twice more. If all is well, you're ready
to go. Take a small bucket of water or a garden hose and rinse off the
caliper to remove any brake fluid that may be on it. Repeat this procedure
on the other side and you're done.
Step Seven: Wheel Reinstallation. Normally, you'd think this
is easy, however I want to share a couple of tips with you that will make
your life better and easier in the future. First, when you put your wheel
back on, align the valve stem of the wheel with the painted lug on the
hub. Don't ask why, it's a balance thing...trust me on this one. The main
thing is to torque your lugnuts evenly. I suggest 90 lb/ft on aluminum
wheels. Don't skimp on this. USE THE TORQUE WRENCH! By making sure you're
wheels are torqued evenly, you lessen the chances of rotor warping due
to uneven heat transfer between the wheel and hub/rotor assembly. It doesn't
sound like much, but it matters.
Step Eight: Rotor Break In. This step will only need to be completed
if you are putting brand new rotors on your car. The proper procedure for
'seasoning' NEW rotors is to take the car up to about 25 MPH then slow
down gently to about 5 MPH. Do this 4 or 5 times then park the car for
a two or three hours until the rotors are back to ambient temperature completely.
The reason for doing this is that it helps to align the molecules in the
steel making the rotors stronger and less prone to warping.
There, you now have new and better brakes for your MN12. I hope you
enjoy this kit as much as I do mine. Just be careful and drive smart and
safely.
God Bless and Fly Low!
Sir William TCCoA President
| Sponsor Links |
|
|
|


